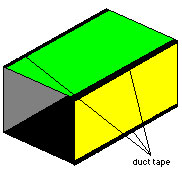
Step 9: Reinforcing the Joins
Now that the box is shaped, reinforce all the corners. Run long strips of duct tape down every join to ensure the structure is rigid and light-tight.
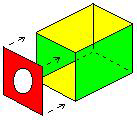
Step 10: Installing the Lens
Insert your Fresnel lens into the focusing board you prepared in Step 6. Secure it firmly with duct tape to one end of the smaller (inner) focusing box.

Step 11: Attaching to the TV
Position your TV upside down (required for the image to project correctly). Secure the outer box to the front of your TV with duct tape, ensuring no light escapes between the screen and the box. Finally, slide the focusing box inside the outer enclosure. Your projector is now assembled!
Step 12: Focusing the Image
Start with the lens about 2 inches from a wall. You should see a small, bright image. Slowly move the entire TV and projector unit away from the wall to increase the image size. Once you've reached your desired size, slide the inner focusing box in or out until the picture becomes sharp.
Pro Tip: The Upside-Down TV
If you prefer not to turn your TV upside down, you can place it flat on its back (screen facing the ceiling) and use a mirror positioned at a 45-degree angle at the end of the projector box to bounce the image onto the wall.